Saturday, June 28, 2014

In Search of Scenery at the Grand Canyon!

From the title of this post, you would think it would be a no-brainer - every view of the Canyon is scenic!  But you know me - I don't like to make life too easy - I'm thinking of night-time scenics!  How about a night exposure that says "Grand Canyon" with stars and Milky Way stretching overhead...  The problem, of course, is that the Canyon is awfully dark at night.  Unless there is a little moon to provide some ambient light, it is literally a black hole!  Take, for example the image at left, taken while imaging for the previous post on airglow observations at rimside.  The minute-long exposure with a fisheye lens at F/2.8 if anything overexposes the sky (minor levels adjustments), but other than the lights of Phantom Ranch at the bottom of the Canyon, almost no Canyon details are seen, even though the Double Cluster and Andromeda Galaxy are seen at right central and far right.  The small orange sky glow is from Page, about 70 air miles distant.

But it must be possible, since it has been done!  I'm a big fan of Wally Pacholka, who makes a living shooting scenics, particularly night scenics at National Parks.  While he has few of the Canyon at night (he must have noticed the same "black hole" effect I mentioned above), the one classic Canyon image he has is of the Desert View Watchtower under the Milky Way.  The Watchtower is probably the one manmade emblem of the Canyon recognized by most.  Built in 1932, designed by noted architect Mary Jane Coulter, it is based on ancient pueblo watchtowers.  I've blogged about it before, but I was interested in improving on Wally's shot - one reason I've been practicing my Milky Way Panoramas the last month or two.  It is also one of the reasons we went up to the star party at the Canyon a day early - to have a night off to attempt the shot.  Unfortunately, it clouded up on our early arrival, so I sneaked away one night after the peak of the public had passed our telescope to make the 30 mile trip.  But fate conspired against me - not only was the Watchtower brightly lit by a couple spotlights, but the viewing angle was wrong to get the tower under the arch of the Milky Way...  I would have had to walk 50 meters out into the canyon to get the shot I wanted!  The issue is illustrated at left - a brightly lit tower, Milky Way barely visible and decentered from where I wanted it...

But since I was there, I took some photo sets.  Looking back on it now, I should have gone to the van for a pair of towels to help shutter the spotlights - oh well, next time.  As a result, I needed to keep exposures brief to keep from blowing out the tower, and would have to try to stretch the Milky way back into visibility.   Shown here is the result - a 4-frame mosaic of the tower and Milky Way, stretching to the Big Dipper on the far left to almost the center of our galaxy at right.  The brilliant lights on the right side were another problem - the little cafĂ©, though long-closed for the day remained lit up at night...  At least the brilliantly lit gas station (also closed) wasn't a factor off the far right side of the frame.  Besides the tower and Milky Way, a low-level display of airglow was going on (greenish glow near horizons), and the distant glow of Page, and perhaps the marina at Lake Powell.

A night later, while imaging for the most recent airglow post, I finally thought about and took a couple exposures that tried to show the "native" Canyon at night.  Shown here is a view from Yavapai point, looking east towards the Desert View Watchtower, about 15 air miles distant.  Yes, the spotlights are easily visible from that distance, as well as the snack bar, and also the brilliant gas station, visible from over the horizon from scattering.  But Canyon details are finally visible in the 4 minute (!) exposure, lit up by starlight and the light of the Milky Way passing high overhead.

Well, practice makes perfect - I'll keep practicing and seeing if I can improve my technique.  What I've learned so far - high ISOs help to shorten exposures, as do fast lenses (kit lenses at F/3.5 or slower just won't do!).  Short exposures are needed to minimize star trailing caused by Earth's rotation.  It is likely my post-processing that needs tuning - I'll post my mistakes here as I learn!

Airglow Over The Canyon!

There are many glows in the night time sky.  In towns and cities, the normally dark sky is diffusely lit by the scattering of man-made light sources from dust, humidity and aerosols.  This "light pollution" limits many types of observing from urban areas.  But from the Grand Canyon and other dark sites, even mountaintop sites here in Arizona, there are other types of natural airglow.  Aurora, or Northern (or Southern) lights are from energetic particles from the sun coming down the magnetic field lines of the Earth, interacting with the upper atmosphere, mostly at northern (or southern) latitudes, very rare in Arizona.  But the topic of this post, which I've covered before, is of airglow, fainter, but generally more visible from anywhere on the Earth's surface.  Shown at left is the view from the International Space Station, with airglow seen as a diffuse greenish glow in the atmosphere.   An excellent discussion of various properties of airglow is presented in the archives of Atmospheric Optics and Optics Picture of the Day, maintained by Les Cowley.


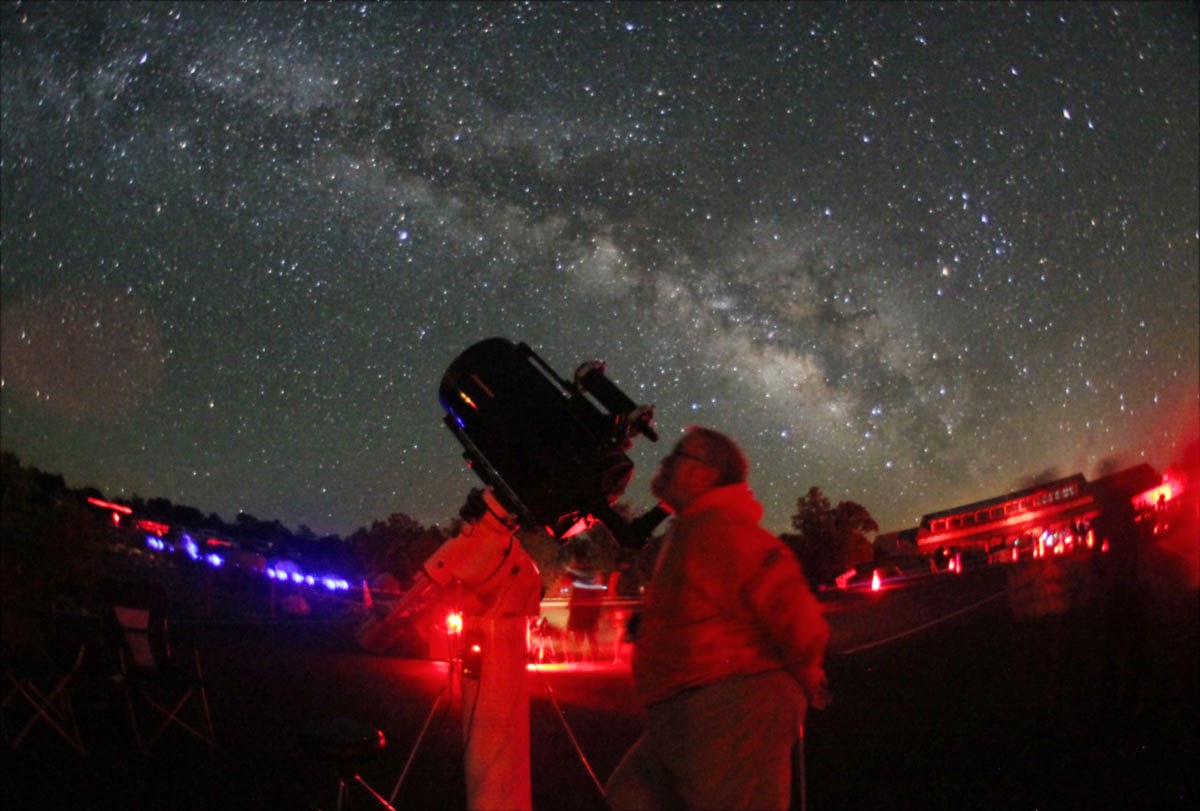
While obvious from orbit, where you see a stronger glow because of the long path length an observer at altitude would look through, it is harder to spot from the ground.  The last few years we've had good displays from the Grand Canyon Star Party, perhaps because of the dark northern sky, and also perhaps because they are generally held near the summer solstice.  Airglow is caused by excitation of molecules in the upper atmosphere by ultraviolet light of the sun, and the light of the glow is discharged at night after the sun sets.  At the Summer solstice, my thinking is that with the long days, and the sun not being very far below the northern horizon, the airglow display from Northern Arizona might be enhanced.  While the green glow is caused by the excitation and discharge from oxygen molecules, in the near-infrared, the sky is aglow from OH emission caused by the same effect.  The IR emission was discovered by Aden Meinel in the 1950s, a well known astronomer of the middle of the last century that all Arizonans likely know (and I had occasion to meet several times).   Fortunately, I brought my IR-modified Canon 20D, which captures near-IR redward of 720nm.  At left is shown a fisheye view showing this OH emission - it looks like clouds, but the sky is just aglow from a multitude of emission lines.  There was no moonlight, no city lights to illuminate these "clouds" from below...  Looking North towards Polaris, just above center, the fisheye view shows the Big Dipper at left to Cassiopeia at right.


Comparing the above view to a visible-light image, the first thing that I noticed is that besides the change in airglow, even the constellations look different!  Check out the comparison at left, showing the view of the Big Dipper from the picture above, to the visible-light view.  With the lines I've drawn showing the dipper outline, there seem to be "extra" stars on the near-IR view.  Of course, it would look different with different wavelength coverage!  The three stars pointed out in the IR view are red variable stars or otherwise cooler spectral types that appear brighter in the IR view than they do in visible light...  As seen in the right image taken a few minutes later than the IR shot, the visible-light image is dominated by the greenish glow of oxygen emission, though since we're not in the ISS looking across at it, it appears brighter near the horizon where you are looking through a larger cross-section of the emission...


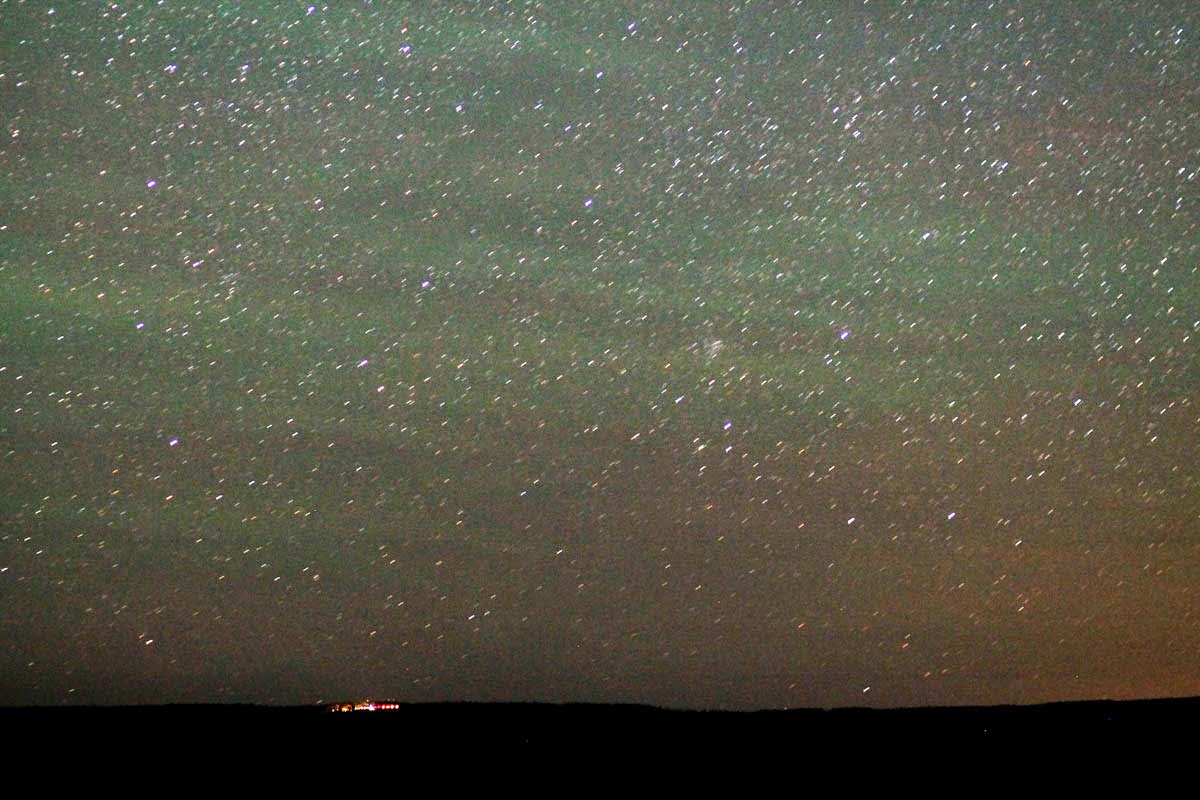
So here are the full-size frames from the fisheye
view in visible light at left, and at right is a frame from an 80mm lens shooting across the Canyon to the North Rim Lodge and stars and airglow to the horizon.  Certainly if there were clouds (as it appears in the IR view above, but it was perfectly clear), there would be obscuration of the rising stars.  You can also see from these images that the airglow is not uniform in intensity nor static.  "Gravity Waves" propagate from the lower atmosphere, affecting the density and chemical abundance, changing the appearance of the airglow pattern.


And while single frames are of interest, many frames taken over time show the change in airglow illumination.  While I didn't invest a lot of time in taking frames (a cold wife, waiting in the car tends to shorten the imaging session), taking frames over a 15 minute period, and cycled several times will have to do for now...  Enjoy the view, and keep looking up!


Thursday, June 26, 2014

Grand Canyon Star Party 2014

This year's star party is in the books - for us, anyway!  It continues through Saturday, and as usual the last couple years, we only stayed the first half of the event.  Melinda had a doctor appointment this morning requiring an early return, and having her camp out for more than 5 nights was asking too much!  Yes, we went up a day early to lessen the stress of a VERY long day to drive up (about 7 hours for us from Tucson), set up camp, then observe till late at night.  Plus, arriving the day early on Friday, I had a photo project to try on a night off up there, but it turned out cloudy, so we just turned in early, like an hour after sunset!

Even though the Star Party occurs a couple hundred meters from the rim of the Canyon, in an overflow bus lot adjacent to the visitor center, it took us nearly 48 hours after arrival till we took the walk over to see the Grand Canyon in person.  Just before sunset it was spectacular, as usual.  Shown above is a 5-frame mosaic - it just seems too massive to capture in a single shot!

Returning to the observing site, at left Melinda shows off this year's shirt design.  It is a rerun of the first Joe Bergeron design from 10 years ago with Kokopelli gazing through a telescope.  We took the artists suggestion and went with a sand or tan base color, which I think looks great.  At right my Vanna White clones show off my Celestron 14" on the AP1200 mounting, which is my recent standard setup.  It worked great - the mount is stiff enough to hold the view steady even in the strong breezes we sometimes get at rimside, and by leaving the pier set up, aligned to Polaris, it tracks well enough that we run Saturn upwards at 250X, impressing the visitors with the sharp view from the C14.

Even from night one we had a great supply of telescopes.  I recall the ranger counted over 45 telescopes, and even with the new bigger venue we've enjoyed the last couple years, we were starting to rub elbows.  But we also enjoyed some huge crowds -  since we had an actual counter to keep track of how many people looked through our scope, our counts were actually down a little.  Perhaps with more scopes to look through, each individual scope had a little less traffic.  We've had upwards of 300/night in years past, though averaged about 240 our 4 nights.  Still, over 900 ecstatic customers for our 4 nights is pretty good!  Shown here is an HDR shot near sunset to show details in the sky plus the array of telescopes set up nearby.

With the constant line of public wanting to look,
it takes constant attention, so I was always happy for assistance.  Our buddy Chuck helped out with explaining what we were looking at for the folks in line and pointing out the object with the green laser pointer - when he was available from leading sky constellation tours to the public.  Here he is showing Messier 82 to a group of observers - Chuck on the right in this image, a 20 second exposure with 8mm lens at F/2.8, ISO 3200.  A little later with the Milky Way up a little higher and the crowd departed, I took a self-portrait with the same setup and 30 second exposure...

It was a great time - a lot of work and effort for a frantic 3.5 hours of observing, but the visitors are always so great and impressed with the views we show them.  I was able to have some memorable conversations with visitors from all continents save Antarctica, and we met people who came from as far as Texas just for the star party!  You can't have testimonials any more valuable than that!  More coming soon from this trip...

Thursday, June 19, 2014

Meanwhile, On The Other Side Of The Yard...

It was just a few days ago that I posted about our potted Trichocereus spachianus, which bloomed in the midst of about the driest Spring on record...  Then last night, the queen of the back yard, our Cereus repandus threw out 3 blooms in one night!  Spectacular stuff!  It is amazing to note the differences in the species when it comes to the flowers.  The former potted cacti had buds showing for weeks before finally showing signs of blooming.  The Cereus repandus just showed a bud a mere 8 days before blooming last night!  On 9 June, it was a mere bud just over 1cm long, shown at left.  By last night it had transformed in the about-to-explode bud shown at right.  The viewing angle is similar in both views, both taken with the Canon 100mm macro, but of course, backed up significantly to get the entire bud in at right...  The potted Tricocereus bloom also opened a round sunset, while the "Peruvian apple" blossoms only fully open well after darkness.


I started out shooting a frame every 2 minutes, intending to do a time-lapse of the blooming, though it would be difficult to do better than the one done a couple years ago...  The flowers are huge - something close to 7" diameter!  The shot at left was taken when finally wide open something close to Midnight...  Of course, I had to do a focus-stacked shot, assembled from 14 frames taken at slightly shifted focal positions for increased depth of field.  Shown at right, the close-up shows nearly everything in focus.


Another big difference from a couple nights ago were the surprises found when doing the regularly-exposed shots all night - pollinators showing up to do their job!  I had 2 cameras exposing until the shutter blew up on one of them, and caught some very nice shots of Rustic Sphinx Moths.  While I had caught a couple back when doing the time-lapse before (a couple months later in mid-August), the pictures taken last night show their incredible probiscii - as long or longer than their considerable wingspan! The shot at left shows the best overall shot of the moth, likely resting while feeding on nectar.  At right shows one likely coming in for a landing or hovering with the incredible proboscis.


Similarly, if you can tolerate one more, another is coming in from a different angle, but shows a similar long proboscis...  It is always incredible to watch the short-term changes as these flowers open and close up again by sunrise.  Don't know if I'll assemble the time-lapse, but if we get more buds later in the summer, you can bet I'll be out looking for camera prey like these moths again too!

Wednesday, June 18, 2014

New Mount for the New Scope!

With the new TEC 140 scope from the last post, I was also in need of a new mount.  For astronomy applications, the beefy AP1200 I've had for a couple years works great.  However, sometimes you don't need the heavy motorized tracking mount for terrestrial use - for taking pictures of distant objects or for quick-and-dirty low-power sky viewing...  So I envisioned something simpler, that provided smooth motion that wasn't too expensive to sturdily support the 20 pound telescope for imaging or viewing - even something I could make myself to satisfy the cheapskate in me... 


Initially I was thinking shafts, bearings and brakes, but gave those thoughts up early because of the complications of fabrication.  Then I decided to upsize a mount I had for small scopes - a sheet of Teflon is pinched between 2 disks to provide smooth, buttery motion.  In this case, I ordered some 2" by 6" aluminum tubing, with additional 6" disks for bearing surfaces.  I also needed a dovetail adaptor plate to adapt the scope to the mount.  The raw materials and adaptor are shown above.  Aluminum was about $100, the dovetail plate was $130.  My design had an L-bracket with disks welded to the tubing to act as bearing surfaces.  At left, the rectangular tubing is in the horizontal band saw being cut off at a 45 degree angle.  The cutoff piece rotated and welded back on provided the L-shape.  I had a local welding shop (A-1 Fabrication) weld the joint, the 2 disks and reinforcements.  They did a great job and charged $75.  The picture at right shows the bracket clamped into a mill to machine one of the disks flat (warped some in welding).


After machining both welded disks flat, I spent the better part of a weekend day in the lab drilling, tapping and assembling the mount.  I already had a very sturdy Gitzo tripod, so machined an adaptor plate to mount it, then the 2 rotating plates that pinch a 1mm layer of Teflon to the welded plates on the L-bracket.  At left is shown some of the excellent welding that Gary at A-1 did.  The knob at center tightens the shoulder bolt, providing both smooth rotation and tension adjustment for the azimuth motion.  There is an exact replica atop the L-Bracket for the elevation adjustment, shown at right, where I am pointing to the 1mm thick layer of Teflon between the disks. 

Here at left is shown the tube rings and dovetail plates that allow fastening the tube to the new mount, and also for accessories - here a Tele-rad used for a finder on the right hand side.  The advantages of a mount like this for general use is that the 6" diameter plates with Teflon between provide a large bearing surface and the motion is very smooth.  Once balanced, you can leave the clamp pretty loose or tighten it to the point it is locked solid, but for most applications you want smooth motion...  While in this view you can see the weight is cantilevered off the vertical rectangular tube, it is centered almost exactly over the azimuth axis where it needs to be.  The tubing has 1/4" walls and is pretty hefty - I'm thinking of attacking it with a hole saw to remove a lot of the weight (think Swiss cheese!), and perhaps anodize it in a bright color to make it eye-catching.  The entire mount is finally seen at right.  About the only disadvantage is that you can't move to the zenith, but as with all Dobsonian (alt-az) mounts, it is tough to get smooth motions at zenith, and I left the vertical arm short in favor of stability rather than leave it ungainly long for access to zenith...

When trying it out for the first time tonight, looking for a suitable target, I saw a curved-bill thrasher down the alley, perhaps 200 feet away, and collected the image shown here at left.  For now I'm planning on using it in its current form and see if there are other modifications needed.  The only other expenses to date from above was $20 for the Teflon sheet and $10 for the knobs, for a total of $335, with some sweat equity thrown in.  For that price it seems to perform pretty well, providing both good performance, and safely mounting the expensive optics.  I'll post some updates as more images come in...

Monday, June 16, 2014

New Optics!

About a month ago I had a chance to invest in some new optics.  The telescope is a TEC 140 - a 14cm F/7 diameter triplet apochromatic refractor.  It is quite the Cadillac among the Chevys  - beautiful optics with absolutely no visible color aberrations, and a focuser built like a tank.  The owner listed its availability on the "AZ-Observing" listserve.  One of the reasons I jumped on it is that I've used one frequently on Kitt Peak where it is mounted on the Roll-Off-Roof 16", and I've posted a few images from it before.  For proper use, it really needs an aligned mount and autoguider, so contacted my buddy Pat, who just finished his observatory down near Benson.  The scope slid right into his mount, a G-11, and we used my little autoguider scope with his camera and mount for a few images.  Besides trying out the scope for the first time, I was also contemplating the autoguider camera to see how well it worked.  Next time I visit Pat, I'll see if it works with my AP1200 mounting...


Note that the evening I visited him was the day after our Kitt Peak Star-B-Que, so the crescent moon was high in the sky and the first natural target.  So this image can be directly compared to those taken 24 hours earlier from that blog post.  That image was a mosaic from a series through the 14" telescope.  The TEC has a focal length of 980mm, so the moon comfortably fits into the frame of the APS sensor of the T3 Canon I was using. 


After hooking everything up, it was apparent that the setup was working fine.  The autoguider requires use of a laptop computer - always a drawback for me since I run off batteries, but nowadays a common accessory.  Since I was also new with using the T3 under a dark sky, I continued to run at some high ISOs, and for the first stellar target shot the Leo Trio, with Messier 65, 66 and NGC 3628 (counter-clockwise from lower left).  This is a combination of 9 frames of various exposures and ISOs...  My intent was to only prove the setup worked, but before shutting down, we moved down to take a shot of the great globular cluster Omega Centauri.  At right is a single 2 minute exposure at ISO 800.

So the scope shows promise, not only for astronomical targets, but I anticipate it will be fun for terrestrial shooting too at long-range.  I'm working on a mount so that it can be used when we go to the Grand Canyon Star Party later in the month.  It should work well for shooting those mule trains and river rafters far below the rim - can't wait!

Friday, June 13, 2014

A Beacon In The Desert Night!

A year ago we blogged about a suspected cereus cactus that bloomed out of a pot in the back yard.  I still don't know what it is, but suspected it is a cereus from the night-blooming flowers that closely resemble others in that family.  It was just a couple nights ago I last blogged about how miserably dry it was this year and we needed to water anything we wanted to stay alive.  Well, every week or so when I think about it I throw a little water in the pot and even as I wrote that post the other night, the bud this plant was showing a little activity, shown at left.  It is usually tough to predict exactly when they are going to bloom, but it was definitely close!  Turns out 24 hours later was the answer!


That next night I was running around with the cat feedings and immediately noticed the change.  The huge bud was much changed from the above image.  Not only was the front part much swollen, but the stigma part of the inner flower was protruding from the tip of the bloom, shown at right.  So far, all these images are single-shots, taken with the 100mm Canon macro lens.  But given the rapidly fading night, the need to shoot wider apertures, and given all I've learned about focus stacking to deepen the depth of field, it was time to get to work!  I decided against trying to do a time-lapse video...  I did that a couple years back with another variety of cereus, and while spectacular, I wanted to work more with focus stacking and higher magnifications...


I've talked about focus stacking before, and the results are quite incredible!  In short, multiple images are taken with slight changes in focus between them.  There is an easy-to-follow video tutorial link in my previous post that shows how to combine the sharp parts of each image in Photoshop that leads to incredible depth of field, if you want that sort of thing.  Of course, sometimes you only want to keep the object of your interest in focus, but in macro shooting, generally you only have a very narrow depth of focus, so for subjects like a large flower in dim light, it is a natural!  In the image at left, 8 frames with slight focus changes between are combined to keep nearly everything in focus while shooting straight down the flower...  Taken moments after the shot above, it is a different perspective you wouldn't be able to get in a single shot (and have it all in focus).


The bloom opens relatively quickly as the sun approaches the horizon.  Less than 60 minutes later, the flower bloom finally opens to start to reveal the interior.  At left is a 14-frame focus stack to keep all details in focus.  As you can see, the depth of field is incredible!  The stigma and sepals are a couple inches apart and otherwise couldn't be in focus at the same time.  At right is a close-up of the same image, at nearly full camera resolution.  While the detail is spectacular, note that there are some artifacts - particularly around the petal inner aperture.  In the shots focused on the deep interior, the out-of-focus petals obscured part of the details and can be seen as a diffuse zone against the interior structure.  But these artifacts are hardly objectionable - bet you didn't spot them before I pointed them out!


And as a demonstration as to what the original frames looked like, at left here is a single frame of the 14 used to put together the above focus stack.  You can certainly see when comparing it to the final focus stack above it how much you gain from combining the multiple frames...  I took another focus stack of the oblique view just afterwards, another 13-frame stack at right that keeps the entire bloom in focus - F/7.1 was my standard F/stop here to compromise light-gathering in the twilight and minimize diffraction at smaller apertures.


Shortly after the above, it got dark, and for subsequent shots, I was focusing and composing by flashlight - not as much fun as you imagine!  Fortunately it was the day before full moon, so I didn't need too much extra light.  At left, just to prove it could be done, is a focus stack of 3 frames, each 20 seconds exposure by moonlight!  At right is sort of a maximum close-up I can do with the macro plus extension tubes showing some of the microscopic details of the stigma.  It was a single exposure with the on-camera flash.  It would, of course, benefited from focus stacking, but in total darkness, it was tough to get any sort of focus at all, let alone try to get systematic changes in focus for a series.  Some other time!


Before bedtime I checked out the flower again - appearing pretty much at full-open.  While a 2-frame focus stack (at F/9 to get both flower and cactus spines in focus), failing light wasn't a reason to keep the aperture open with use of the on-camera flash.  The last shot on the right taken the next morning shows not a lot of overnight changes.  The flower looked pretty good, like it hadn't been visited by very many night-time pollinators.  I've never seen this cactus set fruit, perhaps the pollinators aren't out this time of year, or perhaps there aren't enough of this species around to cross-pollinate.  But it is always a fun subject to practice new techniques, even for the night-bloomers!

EDIT: It has a name!  Coworker Phil Muir suggested this cactus might be a trichocereus.  I normally think of my neighbor Jack's beauty when that name is mentioned.  Doing a Google image search, I found an exact replica of our potted cacti, Trichocereus spachianus, or Echinopsis spachiana

Tuesday, June 10, 2014

Saving The Natives!

Time to rant about the weather again!  While the astronomer in me likes to see blue sky every day, like the song says "If you want the things you love, you must have showers" (Pennies From Heaven, 1936).  Tucson, while you expect to be dry since it is smack dab in the middle of the Sonoran Desert, is still woefully short of its normal dose of rainfall.  Through May we normally have just over 3" of rain for the year, but so far we've had a single rainstorm, split between the first and second of March for a total of .6"!  Before that, you have to go back to the week before Christmas when we had .2"... So it has been dry - a dry heat, like they say, since our highs our spiking well over 100F lately, though we've not broken 110 yet.  I'm still amazed at the extremes here - growing up in the Midwest, the outer surface of an icy drink was always wet from condensation.  The other night at the 10pm weather, the temp was still 88F, and the dewpoint (the temperature you would get condensation) was -2F for a relative humidity of 3%!  That is just astounding to me...

Anyway, if you have trees or plants of any kind, even the native plants that would normally live in the area, they need monitoring and regular watering. Case in point are a couple prickly pears I planted about 5 years ago in the front yard.  I'd not been paying much attention the last couple weeks and they were looking pretty ratty, even though it sported a bloom a week or so ago.  The picture at left shows the before image from 3 days ago - just shrunken incredibly.  At left it is shown today after a couple sessions with the hose dripping on it.  The pictures were taken within a few minutes of each other to compare Saturday's view to today (Tuesday) for matching lighting.  It plumped right up and looks a lot happier!


Here is a close-up of one of the pads taken before and after.  I'm glad it recovered.  Though it is not doing well this year with the lack of rain, this plant was started from a single pad about 5 years ago.  The plant I cut it from was quite incredible - each pad of the plant was like a plate of flowers, with buds and blooms covering the edge and popping out of the center of the pads too.  I think it needs a lot more rain for that much activity.  When it is this dry they nearly go into suspended animation without much new growth to save energy.  Once the Summer rains start in a month or so, it is amazing how fast they will respond!  I can't imagine trying to keep a green lawn in conditions like these!

Monday, June 9, 2014

The Pothole On The Road To Recovery...

We haven't been blogging much lately - sorry about that...  We've been tired, working hard, and there have been some developments on the road to Melinda's cancer recovery.  Her PET scan a couple weeks ago - the gold standard in monitoring and tracking her cancer, showed a "hot spot" in her pancreas.  It is not pancreatic cancer, but rather a secondary site from her small-cell lung cancer.  Her oncologist seems not to be overly concerned, but quickly referred her to the radiation oncologist who prescribed her to 5 sessions of radiation over the course of a week to zap it.  She is 3 days in and will finish Wednesday.  Her pancreas is close to her stomach and small intestines, and one of the side effects is heartburn and discomfort from those organs, but knock-on-wood, none of those symptoms have been seen.

Since our return from the Midwest a month ago her main issue has been extreme tiredness.  While she felt well visiting family and friends there, we both had cold-like symptoms on our return. Whether that was an issue or just residual effects of her lung and brain radiation through the Spring remains to be seen. The doctors have her on her second round of steroids to reduce the effects of her radiation and trying to up her energy level. In the meantime, we're ready to be past the treatment phase and get into the recovery! Fingers crossed that this little lesion was a rogue tumor that somehow survived the chemo and is the last to be zapped by the current round of radiation... We could use a break that lasts longer than a month!

Tuesday, June 3, 2014

A Getaway Under The Stars!

One of the perks of working part-time at Kitt Peak National Observatory is that I know who to ask permission for after-hours access.  One of my co-workers at my Mirror Lab job was talking to me about where to hold an evening observing session, and since I help facilitate events for the local astronomy club, we got permission to use the picnic area, about 1.5 miles below the summit of Kitt Peak.  It is a great site - dark skies, cool temperatures (about 6500 feet elevation), flush toilets, a nice pavilion with picnic tables, and the employee association arranged use of their gas grill too.  The only disadvantage for your average Tucsonan is the 80 minute drive back to town after a late night of summer observing, where it doesn't really get dark till after 9pm.  But after temperatures approaching 105F in Tucson, I was looking forward to jacket, or at least long-sleeve temperatures at elevation!

I promised to have the picnic area open when the observatory grounds closed to the public at 4pm since the picnic area has been closed because of the fire danger this Spring (it has been extremely dry).  I needed to drive out in the peak of the heat to get the key and check in with the night time crew.  They convinced me to bring along a radio "just in case", and I opened the gate right at 4pm.  Staff scientist John Hill arrived minutes later and set up a hydrogen-alpha solar scope, so we had a nice view of  solar prominences coming off the sun's limb.  I set up a pair of cameras to work on a time-lapse of the mountaintop with the VLBA (Very Long Baseline Array) busily working in the foreground.  Once people started arriving, we set up the grill, had a real feast, and set up a few scopes for the night time viewing.  An interesting side note - the fire alarm sirens went off - easily audible from a mile away, which would have really worried us, but thanks to the radio I had, found that the electronic monitoring at the 4-meter was misbehaving, causing a false alarm.

As the sun set and it started getting dark, I shut
down one of my cameras to take some lunar photos.  The crescent moon was beautiful next to Jupiter in the west and I took a 4-frame mosaic through my Celestron 14" that was assembled with Microsoft ICE into the assemblage here.  Of course, the original files are heavily down-sized for the image at left, so just one of the frames is shown here at right.  I'm no expert at identifying features on the moon, but I believe that the large walled plain at left is Mare Crisium, the Sea of Crises.


Of course, one of the coolest things to see when there is a young moon such as this, is to expose a little longer and record the "earthshine".  When the moon is new or a thin crescent like this, from the moon the earth is fully illuminated, so an exposure of a couple seconds will record features on the moon not directly lit up by the sun.  At left here is a 2 second exposure of the southern cusp of the moon.  The exposure is long enough to show the normally bright rayed crater Tycho at top center, here lit up by the nearly full earth.  Also seen at the very top just off the limb is a moderately bright star in Gemini.  The other really neat thing shown in this longer exposure are a couple mountains apparently separated from the sunlit cusp of the moon.  They are tall enough that they are lit up obliquely partly from behind - it is kind of neat to see it in close-up...


Finally it got dark and the 3 scopes got put to
good use by the 20 or so that attended.  Roger had an 8" diameter triplet refractor he had just finished and was enjoying "first dark light".  He also helped Phil in building his 10" Newtonian, then my 14" was available too.  Favorite among the views were Omega Centauri, a spectacular globular cluster, the planets Jupiter, Mars and Saturn, and a multitude of galaxies.  I split my time pointing the 14", tending to the lone camera still shooting the stars over the Observatory, and using my newer T3 camera at its higher ISOs to take snapshots of our observing session.  At left is one of the observers checking out the Ring Nebula, M57 with my C-14 taken with a 30 second exposure with the 16mm F/2.8 fisheye lens.  This was taken at 11:30 and we still had a good-sized crowd working the eyepieces...  A little later, I used the same lens rotated vertically to take a 4-frame panorama assembled here at right.  The view of our edge-on Milky Way galaxy is still the most amazing sight that can be seen - and you don't even need a telescope!


Finally you get to see the results of 2 cameras shooting 1400+ frames, providing a continuous 6+ hour time line from about 4:30 to 10:40.  For the daytime shots 3 frames/minute were taken, slowing to 2/minute when fully dark to allow exposures up to 25 seconds.  The VLBA dish is part of a 10 telescope array scattered from Mauna Kea, Hawaii to the Virgin Islands and synthesizes a signal as if it had a dish nearly the size of the earth!  It was extremely busy, looking at dozens of objects, none for very long as you can tell from how much it is moving.  As the sun sets and it gets dark, the bright star Vega is the first to come out, then eventually the 3 stars of the Summer Triangle and the Milky Way rises over the Observatory and the glow of Tucson 45 miles distant.  At least 6 satellites are seen in the early evening sky, including an Iridium Flare that I was going to look for, but missed, though the camera got it towards the top of the frame.  You can watch it in this viewer, or go to full-frame and high resolution for maximum detail.


It was a great evening - cool temps and spectacular skies!  It was tough to call it a night, but we finally shut it down and left about 12:30.  After returning the keys, we made it home by about 2am - just a little bit of a late night for us!  I think the general consensus is to try it again next year - fun stuff!